

What is Docker?
Docker is a software platform that allows you to build, test, and deploy applications quickly. It enables users to group applications and their dependencies in isolated environments called containers. This makes it easy to design and shape containers with minimal instructions. Docker containers are lightweight and efficient, working independently to prevent interference between applications. Dockerizing your React application can provide many benefits, including a consistent development environment, easy deployment, isolated dependencies, and faster builds.
Dockerfile
To build an image of your application, you need to specify instructions for the same in a Dockerfile. This instructions will be executed one after the other.
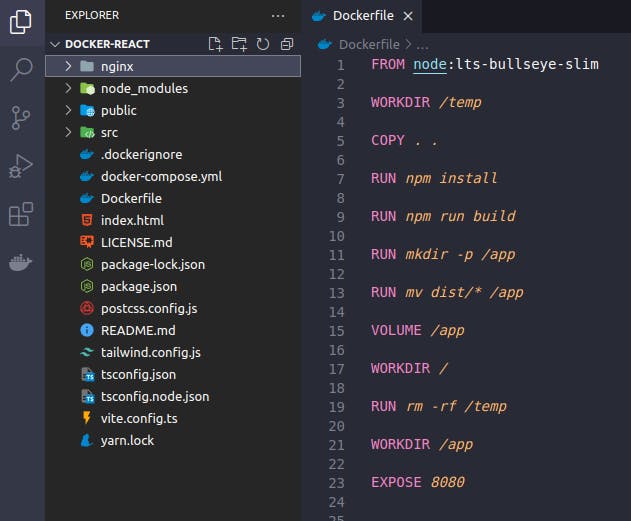
The instructions sequence from top to bottom is to use a specific Node image, copy all files from the React App to a temporary folder, install all dependencies from package.json, execute the build, move all files from the ‘dist’ folder created to the ‘app’ folder, remove the temporary folder, and expose port 8080.
To build the image:
docker build -t react-image .
The -t option specifies the name for the image, and the dot at the end indicates the location of the Dockerfile; in this case, the root folder.
.dockerignore is a configuration file that describes files and directories that you want to exclude when building a Docker image. E.g. /node_modules
Container
To create a container from the image run the command:
docker run -it -d --name react-container -p 8080:8080 -v react-volume:/app react-image
-druns the container in the background, not display the running process on your terminal, this is called detached mode.-itruns the container in interactive mode; allows you to interact with the container through the command line.--namespecifies a name for the container.-pmaps a host port to a container port.-vmounts a host volume inside the container. In this example we create a volume named react-volume inside the /app folder.react-image is the name of the image we created.
Nginx
Nginx is a open-source web server and reverse proxy server. It is used to serve a React application with Docker in a production environment.
To separate Dockerfile images, create a nginx folder with two files: a Dockerfile and nginx.conf
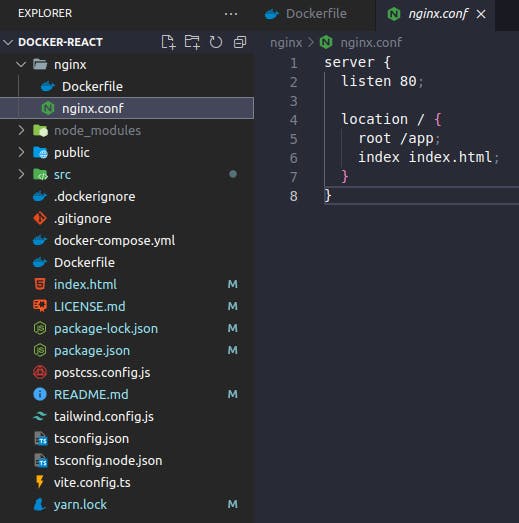
- ningx.conf is a file to modify the default configuration of the nginx image. With these commands we specify to nginx listen on port 80 and when a client access the root (“/”) of the application, look in the root of the image container for the /app folder and then find the index.html
The Ningx Dockerfile will have two instructions:
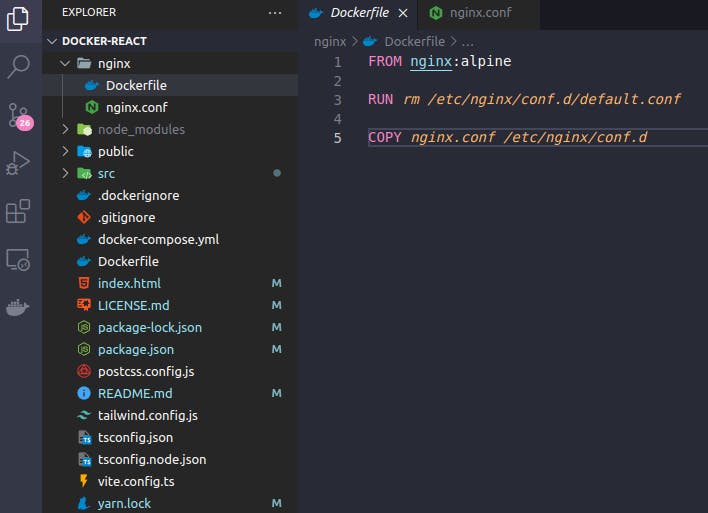
- From an Nginx image, remove the default.conf file, and copy the nginx.conf file to its place, in the same path.
To build the image:
docker build -t nginx-react
And run the container:
docker run -d -it --name nginx-react -p 80:80 --volumes-from react-container nginx-react
The only new command here is --volumes-from , which will make any volumes defined in the react-container available in the nginx container. Now, nginx-container have access to all files created after the build on the react-container.
Finally, the React project is running in a Docker container and can be accessed through the browser at localhost:80 or just locahost because 80 is the default port.
Docker Compose
Docker Compose is a tool for configuring and operating Docker applications that consist of multiple containers. By utilizing a YAML or YML file, you can set up the services required for your application. Then, with a single command, you create and start all the services from your configuration.
Create a docker-compose.yml file:
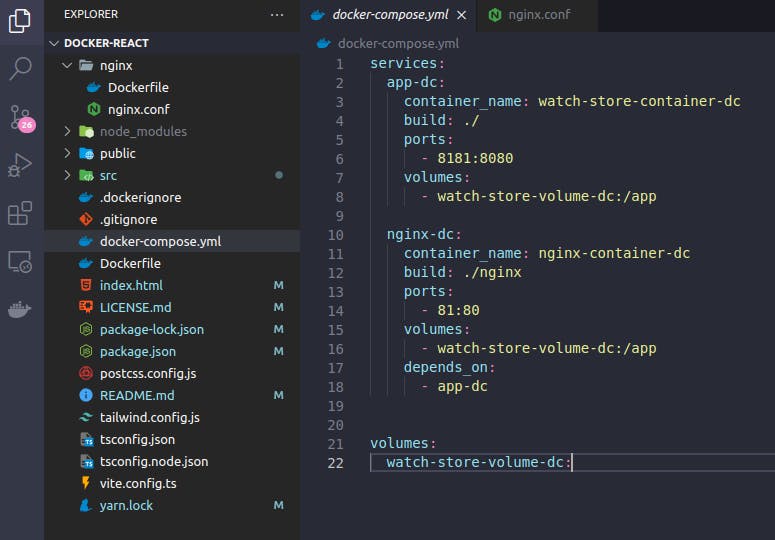
The docker-compose file have all instructions for the containers (app-dc ; nginx-dc) and it will create and start them with a single command:
docker compose up -d
Developers can achieve a smooth and scalable deployment by using Docker containers to encapsulate the application and its dependencies, along with the powerful web server provided by Nginx.